古いASP.NETのプロジェクト(言語はVB)をVisual Studio 2019で開いて、デバック実行したところ、「assenbly.csが見つからない」とエラーになる。
これを回避するには、以下の設定を行う。
- 上部メニューから「デバッグ」を選択する
- 「オプション」を選択する
- (デバッグの全般で)「マイコードのみを有効にする」にチェックを入れて、OKで閉じる
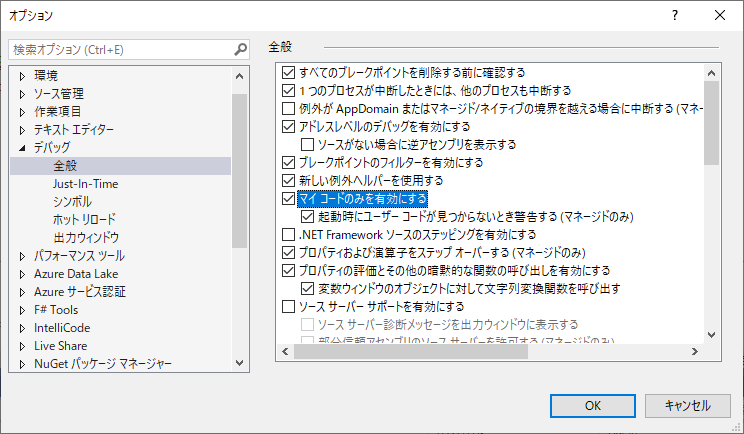
もう一度、デバック実行して、「assenbly.csが見つからない」が出なければ問題なし。
古いASP.NETのプロジェクト(言語はVB)をVisual Studio 2019で開いて、デバック実行したところ、「assenbly.csが見つからない」とエラーになる。
これを回避するには、以下の設定を行う。
もう一度、デバック実行して、「assenbly.csが見つからない」が出なければ問題なし。
企業の標準ブラウザをどうするかについて考えてみた。個人的な見解だが、先に結論から書くと・・・
でよいと思う。
標準ブラウザをChromeとEdgeのどちらにするか、ということについてはデバイスおよびブラウザでの設定の同期(お気に入りやパスワードなど)をどうするかが中心になる。
これは、設定の同期を許可するかどうかを、ログインするアカウントの管理で行うことができる。ここが2つのブラウザの大きな差というか特徴になる。
例えば、M365BPやE1以上を使っており、Google Workspaceを使っていないなら、たぶん、Edgeの方が管理性がよい。かつ、グループポリシーなどで、Edgeの設定も変えることができる。MacやAndroidの場合は、グループポリシーは使えなくとも、Edgeは提供されるので、同じような環境にすることもできる。Windowsで環境が組まれているのであれば、Edgeの方がよい。
ただ、Windows10の管理で、古いバージョンのWindows10がいる場合は、個別にインストールしていかなければならない手間があるので、そこは最初の手間が必要だ。
逆に、Google Workspaceを使っているのであれば、Chromeの方が使いやすくなる。あとは、Chromebookを採用したりして、企業管理を行う場合もChromeの方がよい。ChromeにはChrome Enterpriseというバージョンが存在し、セキュリティ設定などを行うことができるが、別にライセンスを購入する必要があるなど、不明瞭な部分が多い。
あと共通して言えることは、ChromeもEdgeもリリースが1か月~2か月で、どんどん新しいバージョンがリリースされていく。そのため、PC側は常に新しいバージョンにしなければならないということ。基本的には、自動更新をONにしておくことで、新しいバージョンになっていく。Edgeの場合も、Windows Updateとは独立してバージョンが上がっていく。そのため、特定バージョンに固定して、使い続けるのは困難だということ(他のブラウザ、Firefoxなどもどんどん新しくなる。)。アップデートのタイミングもあるので、最新を含む直近2世代のバージョンがよい。
インターネットにつながず、イントラ環境でのみ使うPCがあり、ウェブシステムがあったときには、なかなか厳しい。固定できなくもないが、次に環境を作るときに、そのバージョンをインストールできるとは限らない。
それから常に新しいバージョンのブラウザになるということは、サポートされるJavaScriptのバージョンも変化する。機能追加されていく分には、よいのですが、マレに機能削除が行われる。そのため、パッケージを導入している場合には、最新のパッチを当て続ける必要がある。自社開発の場合には、影響の見極めが必要になる。例えば、2010年ごろは、Chromeで、JavaScriptのShowModalDialogが使えたが、2014年とかに廃止が発表され、数年後につかえなくなった。アプリのリリース時には、Chromeでテストをしていても、時がたつと使えなくなるものも出てくる。なので、システム運用側も、それなりの覚悟が必要になる。特に利用期間の長いシステムがある場合には・・・。ここは、どちらを選ぶかというよりも、ChromeかEdgeかを考えるときには、そのアップデートのスピードに対応した運用や見直しが必要なってくることを意識する必要がある。
ブラウザのデフォルトの検索エンジンは、Edgeであっても、Googleに変更することができるので、そこは柔軟になった。
標準ブラウザが、ChromeかEdgeかは、使っているプロダクト(Google WorkspaceかM365か)やOSによって、選択するのが良い。
ファイルオーナーを変えてもFTPログインなしでWordpressのアップデートができない。そんなはずはないと思い、いろいろとチェックしたら、wp-config.phpに、過去にFTPの代わりにSSH2でアップデートをするために加えたFS_METHODの指定があった。これが邪魔をしていたようで、消したところ、FTPのユーザを聞かれずにアップデートができるようになった。
/** SSH SFTP Updater **/
define('FS_METHOD', 'ssh2');
設定を変えようと思ったのは、SSH2でのアップデートが失敗するようになったのが原因。プラグインの過去の設定と競合して、機能しなくなるとは。コンフィグまでちゃんと見直す必要はある。
かなり前に、ScanSnap S1500M(S1500)のサポートも終了して、新しいMac OS用のドライバなども提供されていなくて、諦めていた。ついでにうっかりアップデートしていて気がつけば使えなくなっていた。古いMacもあるのでいざとなったら、それを使えばいいかくらいに考えていた。
とても久しぶりに、ScanSnapのMacOSの対応状況を調べたら、なんとサポート終了のS1500MやS1500が最新の「ScanSnap Manager V7」で対応していると書いてある。
macOS Big Sur v11.0 への対応状況を教えてください。
https://faq.pfu.jp/faq/show/3635?site_domain=scansnap
なんとも嬉しい。頻繁にスキャナを使うわけじゃないので、諦めていたがこれで使えるようになる。そして古いMacOSも維持しなくていいのは嬉しい。
アマゾンウェブサービスジャパンが、AWSの事例として、「Nintendo Switch Online」で使われていることを発表した。
なんとなくわかっていたけれど、正式にAWSを使っていると発表されるとやっぱりかとわかって楽しい。もともとスプラトゥーン2のマッチングサーバがAWS上にあると話題になった(マッチングに失敗するという文脈から調べた人が多かったから)。
世界規模のサービスだったりすると、やっぱりパブリッククラウドもAWSやAzureなどのクラウドサービスを使うのかと。日本のクラウド事業者も使ってほしい気はするが、使っているゲームメーカーのところは障害に当たったりするから、大規模だと辛いんだろうな、と思う。価格、安定性、競争力で、対抗できるクラウド事業者が日本から出て欲しい。
https://www.itmedia.co.jp/news/articles/2012/25/news096.html
子画面から親画面に情報の引継ぎを行うために、下記のサイトを参考にして、子画面からコールバック関数の実行を行うように実装して、テストしたが動かず。
https://qiita.com/hidehito108/items/f7ad9fe23736049a76d6
問題の切り分けのために、これだけのテストページを作ったり、変数化されているところをベタ書きにしたりもしたがダメだった。動いていない箇所を特定するために、コメントアウトしたりして、確認して、子画面からのコールバック関数の実行がエラーになっていることはわかった。なにかJSのモジュールでも足りないのかも、と思い調べたが標準のもので動くことがわかり、手詰まり。
画面上は、何も表示されないのでわからず。ダメ元で、ブラウザの開発者ツールを立ち上げてみた。標準のところには何も出ず。それで、いろいろとやっていたら、Consoleにエラーが表示されていた。そこには、下記の内容が表示されていた。
Uncaught DOMException: Blocked a frame with origin "null" from accessing a cross-origin frame.このエラーを調べてみると、ウェブサーバ上のコンテンツを実行していない場合に発生するとのこと。たしかに、確認はWindowsで、フォルダにあるHTMLファイルをブラウザで実行しており、ウェブサーバは介していなかった。テスト用のHTMLファイル2つ(親画面用と子画面用)をウェブサーバに配置して、httpでアクセスしたら、正常に動作した。問題はコードではなく、テスト実行していた環境が原因だった。
.NET Framework 4.8のサポート期限は、動作するOSのサポート期限に影響される。
.NET Framework 4.8が動作するOSで一番サポートが長いのは、Windows Server Standard 2019(の仲間)になる。Windows Server Standard 2019のメインストリームサポート終了が2024/1/9、延長サポートが2029/1/9までなので、.NET Framework 4.8は、2029/1/9までは安心して使用できる(というか延命できる)。
参考:
https://docs.microsoft.com/ja-jp/lifecycle/faq/dotnet-framework
https://support.microsoft.com/ja-jp/lifecycle/search?alpha=Windows%20Server%202019
WordPress 5.6にアップデートしたら、投稿画面の表示でエラーになった。ブラウザの画面には、エラーになったことしか表示されないので、詳しいエラー内容をコピーして確認した。
確認したところ、Javascriptばかりがエラーになっていた。なので、ブラウザのキャッシュに残っているものが悪さをしている。ブラウザのキャッシュを削除して、再度Wordpressの管理画面にアクセスしたところ、正常に投稿画面が使えるようになった。このアップデート後の問題は、忘れたことに発生するので、少しびっくりする。
エラー内容は下記。
TypeError: Object(...) is not a function
    at WithSpokenMessages(WithInstanceId(WithFilters(n))) (https://www.xenos.jp/xxxxxxx/wp-includes/js/dist/components.min.js:7:280912)
    at we (https://www.xenos.jp/xxxxxxx/wp-includes/js/dist/vendor/react-dom.min.js:84:293)
    at zj (https://www.xenos.jp/xxxxxxx/wp-includes/js/dist/vendor/react-dom.min.js:226:496)
    at Th (https://www.xenos.jp/xxxxxxx/wp-includes/js/dist/vendor/react-dom.min.js:152:223)
    at tj (https://www.xenos.jp/xxxxxxx/wp-includes/js/dist/vendor/react-dom.min.js:152:152)
    at Te (https://www.xenos.jp/xxxxxxx/wp-includes/js/dist/vendor/react-dom.min.js:146:151)
    at https://www.xenos.jp/xxxxxxx/wp-includes/js/dist/vendor/react-dom.min.js:61:68
    at unstable_runWithPriority (https://www.xenos.jp/xxxxxxx/wp-includes/js/dist/vendor/react.min.js:26:340)
    at Da (https://www.xenos.jp/xxxxxxx/wp-includes/js/dist/vendor/react-dom.min.js:60:280)
at Pg (https://www.xenos.jp/xxxxxxx/wp-includes/js/dist/vendor/react-dom.min.js:61:14)WordPressからメールを送るために、プラグインのWP Mail SMTPを入れた。送信先をMicrosoft365にしようとしたところ、Proのライセンスが求められるので、その設定を使うのは断念。
次に、「Other SMTP」を指定して、SMTPを「smtp.office365.com」を指定して、実在するユーザを使ったが下記のエラーが出て失敗した。
2020-12-03 03:34:42 SERVER -> CLIENT: 535 5.7.3 Authentication unsuccessful [xxxxxxxxxxxxx.namprd18.prod.outlook.com]
2020-12-03 03:34:42 SMTP ERROR: Password command failed: 535 5.7.3 Authentication unsuccessful [xxxxxxxxxxxxx.namprd18.prod.outlook.com]
SMTP Error: Could not authenticate.
2020-12-03 03:34:42 CLIENT -> SERVER: QUIT
接続は行えているが、ユーザの認証ではじかれているので、Microsoft365側のセキュリティ設定でエラーになっている。接続先のSMTPサーバを、MXレコードで設定しているものに変えてみたが、これもエラーになる。
わかったことは、フリーのWP Mail SMTPだと、Microsoft365(Office365)を使ってメール送信はできない。
.NET5がリリースされている。が、.NET5はLTSではないので、サポート期間が短いので、使いにくい。試しには、使ってみるけれど。
とはいえ、.NET core 3.1を使うのも、.NET Framework4.8を使うのも、どちらも悩ましい。移行前提になってしまう。サポート期間は.NET Framework4.8が長くてよいのだけど、技術移行が発生するし。来年の.NET6が待ち遠しい。